Automation
Sappy Automation System Documentation
Overview
The Sappy Automation System is a comprehensive testing framework built on top of Unreal Engine's Functional Testing and Gauntlet frameworks, specifically designed for deterministic multiplayer testing in the Fury game. It enables automated testing of gameplay mechanics, networking, and the Artillery deterministic simulation system.
System Architecture
Core Components
1. FSappyGameTest (Artillery/Source/ArtilleryRuntime/Public/Tests/SappyGameTest.h)
- Extends
FSappyGameto provide test-specific simulation controls - Manages test state transitions and input queuing
- Integrates directly with the deterministic simulation layer
- Handles buffered inputs with queued fallback for predictable test execution
Key Features:
- Custom tick hooks for server/client simulation testing
- Input queue system for scripted test scenarios
- Test state machine (WaitingForReady → PrepareTest → TestRunning → Complete)
2. ASappyAutomatedTest (Artillery/Source/ArtilleryRuntime/Public/Tests/SappyAutomatedTest.h)
- Base class for all deterministic automated tests
- Inherits from
AFunctionalTestand implementsITickHeavyinterface - Provides Blueprint-compatible test authoring
- Manages deterministic input injection into the simulation
Key Methods:
SappyTick(uint64 TicksSoFar)- Called every deterministic tick (60hz)PrepareTest()- Test initialization before simulation startsQueueInput()- Injects deterministic inputs for testing
Input Types Supported:
ESappyTestInputType:
- Movement: MoveForward, MoveBackward, MoveLeft, MoveRight
- Actions: LeftClick, RightClick, Jump
- Abilities: Ability_Q, Ability_E, Ability_R, ModifierShift
- Extended: ExtendedAbility_R, ExtendedAbility_Q
3. ASappyNetAutomatedTest (SappyAutomatedTests/Source/SappyAutomatedTestsRuntime/Public/SappyNetAutomatedTest.h)
- Extends
ASappyAutomatedTestfor networked multiplayer testing - Manages client synchronization and readiness
- Coordinates test execution across multiple clients
Key Features:
- Multi-client synchronization
- Configurable client requirements (
NumRequiredClients) - Network state validation
4. USappyNetTestComponent (SappyAutomatedTests/Source/SappyAutomatedTestsRuntime/Public/SappyNetTestComponent.h)
- Controller component for managing test state per client
- Handles client-server communication for test synchronization
- Tracks test progression through state machine
Test States:
ESappyTestState:
- None           // Initial state
- MapReady       // Map loaded and ready
- TestPrepared   // Test setup complete
- TestReady      // Ready to execute
- TestFinished   // Test execution complete
5. UGauntletSappyGameplayTestController (SappyAutomatedTests/Source/SappyAutomatedTestsRuntime/Private/GauntletSappyGameplayTestController.cpp)
- Gauntlet integration for command-line test execution
- Manages test discovery, execution, and reporting
- Handles map transitions and test batching
Gauntlet States:
ESappyGauntletState:
- None                    // Uninitialized
- Initialized            // Controller ready
- LoadingNextMap         // Transitioning maps
- WaitingForMapToBeLoaded // Map transition in progress
- WaitingForClients      // Client synchronization
- DiscoveringTests       // Finding test actors
- Running                // Tests executing
- Finishing              // Session cleanup
- Finished               // Complete
Creating Tests
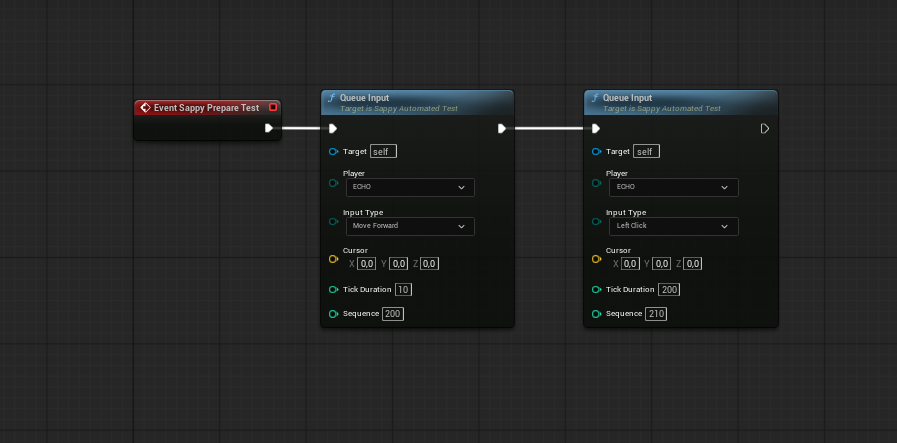
Blueprint Test Example
- Create a Blueprint inheriting from
ASappyNetAutomatedTest - Configure test properties:
NumRequiredClients- Number of clients needed- Test timeout and other FunctionalTest properties
- Implement test logic in Blueprint:
Event PrepareTest
├─ Queue Input (Player 0, MoveForward, Duration: 60)
├─ Queue Input (Player 0, Ability_Q, Duration: 1)
└─ Queue Input (Player 1, LeftClick, Duration: 30)

Event Sappy Tick
├─ Check game state
├─ Validate positions
└─ Finish Test (Success/Failure)
C++ Test Example
// MyCustomTest.h
UCLASS()
class AMyCustomTest : public ASappyNetAutomatedTest
{
    GENERATED_BODY()

public:
    virtual void SappyPrepareTest() override;
    virtual void SappyTick(uint64 TicksSoFar) override;
    virtual bool SappyIsTestReady() override;

private:
    bool bTargetHit = false;
    uint64 TestStartTick = 0;
};

// MyCustomTest.cpp
void AMyCustomTest::SappyPrepareTest()
{
    Super::SappyPrepareTest();

    // Queue deterministic inputs
    QueueInput(E_PlayerKEY::Player_0, ESappyTestInputType::MoveForward,
               FVector::ZeroVector, 60, 0);
    QueueInput(E_PlayerKEY::Player_0, ESappyTestInputType::Ability_Q,
               FVector(100, 0, 0), 1, 60);

    TestStartTick = 0;
}

void AMyCustomTest::SappyTick(uint64 TicksSoFar)
{
    Super::SappyTick(TicksSoFar);

    // Validate game state every tick
    if (TicksSoFar - TestStartTick > 120)
    {
        // Check test conditions
        if (bTargetHit)
        {
            FinishTest(EFunctionalTestResult::Succeeded, "Target hit successfully");
        }
        else
        {
            FinishTest(EFunctionalTestResult::Failed, "Target not hit within time limit");
        }
    }
}

bool AMyCustomTest::SappyIsTestReady()
{
    // Wait for all systems to initialize
    return Super::SappyIsTestReady() && GetWorld()->GetTimeSeconds() > 1.0f;
}
Running Tests
Command Line Execution
note: please build before running tests, since it wont build the code, it will just use latest editor binaries
The test system uses Gauntlet for command-line execution with the AutomationTool:
RunUnreal.exe \
  -scriptdir="D:\Fury\SappyUnrealEngine\Engine\Source\Programs\AutomationTool\Fury" \
  -project="D:\Fury\Fury\ProjectR.uproject" \
  -platform=Win64 \
  -configuration=DebugGame \
  -build=editor \
  -test=SappyGauntletTest \
  -TestLevel=FTest_Fury_Test \
  -TestMaps=FTest_Fury_Test \
  -TestCases=B_SappyTest_Example \
  -BlueprintTest=B_SappyTest_Example \
  -Experience=LyraExperienceDefinition:B_Fury_AutomatedTest_Experience_2 \
  -ClientCount=1 \
  -uploaddir="D:\Fury\Fury\Plugins\GameFeatures\SappyAutomatedTests\Tests"
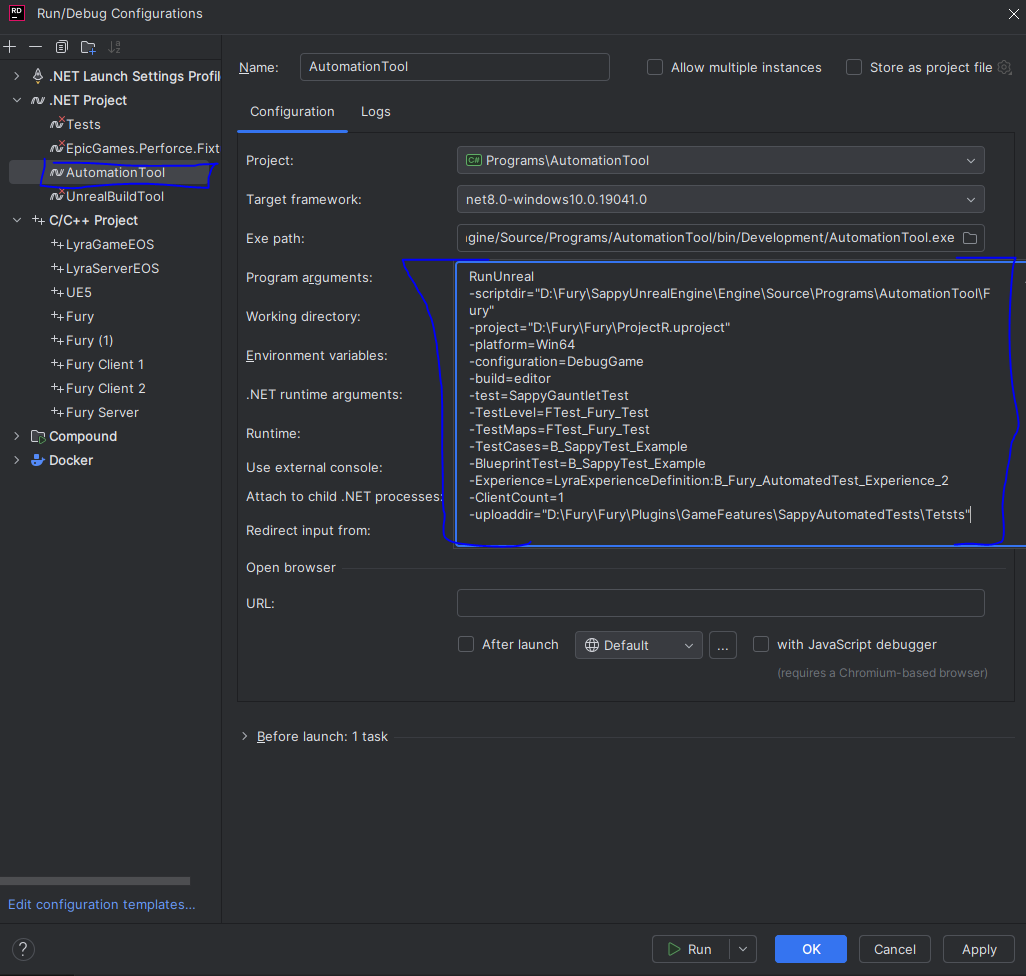
Command Line Parameters
| Parameter | Description | Example |
|---|---|---|
-test | Gauntlet controller to use | SappyGauntletTest |
-TestLevel | Specific map to test | FTest_Fury_Test |
-TestMaps | Comma-separated list of maps | FTest_Map1,FTest_Map2 |
-TestCases | Specific test actors to run | B_SappyTest_Example |
-ClientCount | Number of clients to spawn | 2 |
-Experience | Lyra experience definition | B_Fury_AutomatedTest_Experience_2 |
-uploaddir | Output directory for results | D:\Fury\Tests |
Test Map Naming Convention
Test maps should follow the naming convention:
FTest_*- Functional test maps
Test Actor Naming Convention
Test actors should be named descriptively:
B_SappyTest_*- Blueprint testsASappyTest_*- C++ test actors
Hero Spawning System
Overview
The test framework includes an automated hero spawning system that creates player characters for testing.
USappyTestPlayerSpawnSceneComponent
The USappyTestPlayerSpawnSceneComponent is the core component responsible for spawning and possessing heroes during test execution. It's a scene component that can be attached to test actors to define spawn points and configurations for test players.
Component Properties
| Property | Type | Description |
|---|---|---|
PawnData | ULyraPawnData* | The pawn data asset defining the hero class, abilities, and configuration |
PlayerKey | E_PlayerKEY | The deterministic player key (ECHO, TWO, etc.) |
TestPlayerId | int32 | Client ID to assign the hero to (0-5) |
TeamID | int32 | Team assignment for the spawned hero (0-5) |
Spawn Process
When ActivateHeroSpawnComponents() is called on a SappyNetAutomatedTest:
- Component Discovery: All
USappyTestPlayerSpawnSceneComponentinstances attached to the test actor are collected - Spawn Execution: Each component's
Spawn()method is called, which:- Validates the PawnData asset
- Gets the appropriate PlayerController based on
TestPlayerId - Spawns an
ALyraCharacter - Configures the pawn
- Sets the player key, team ID, and other properties
- Possesses the pawn with the PlayerController
- Readiness Tracking: The
SpawnComponentReadinessarray tracks which components have completed spawning
Setting Up Hero Spawns
In Blueprint Tests
-
Add Spawn Components to Test Actor:
- In your test Blueprint (inheriting from
ASappyNetAutomatedTest) - Add
USappyTestPlayerSpawnSceneComponentcomponents as children - Position each component where you want heroes to spawn
- In your test Blueprint (inheriting from
-
Configure Each Spawn Component:
Component Settings:
├─ PawnData: Select hero data asset (e.g., DA_Hero_Nova)
├─ PlayerKey: Assign player key (Player_0, Player_1, etc.)
├─ TestPlayerId: Match to client ID (0 for first client, 1 for second, etc.)
└─ TeamID: Set team assignment (0 or 1 typically) -
Set Test Requirements:
- Set the test's
NumRequiredClients(test actor class defaults) to match the number of spawn components - Each client will be assigned a hero based on
TestPlayerId
- Set the test's
Hero Spawn Timing
ASappyNetAutomatedTest::SappyPrepareTest() called
    ↓
ActivateHeroSpawnComponents()
    ├─ GetComponents<USappyTestPlayerSpawnSceneComponent>()
    ├─ For each component: Spawn()
    │   ├─ Get PlayerController for TestPlayerId
    │   ├─ SpawnActorDeferred<ALyraCharacter>()
    │   ├─ Configure PawnExtensionComponent
    │   ├─ Set PlayerKey, TeamID
    │   ├─ FinishSpawning()
    │   └─ Possess with PlayerController
    └─ Mark SpawnComponentReadiness[i] = true
    ↓
Wait for all heroes spawned
    ↓
SappyIsTestReady() returns true
Controlling Test Heroes
Once heroes are spawned, you can control them through the input queue system:
// In your test's PrepareTest or SappyTick
QueueInput(E_PlayerKEY::ECHO, ESappyTestInputType::MoveForward,
           FVector::ZeroVector, 60, 0);  // Player 0 moves forward for 60 ticks

QueueInput(E_PlayerKEY::TWO, ESappyTestInputType::Ability_Q,
           FVector(100, 0, 0), 1, 120);  // Player 1 uses Q ability at tick 120
Multi-Client Hero Management
For tests with multiple clients:
- Each client gets assigned a unique
ClientIdviaUSappyNetTestComponent - Heroes are spawned based on
NumRequiredClientssetting - Input commands are routed to the correct client's hero
- All clients must report ready before test execution
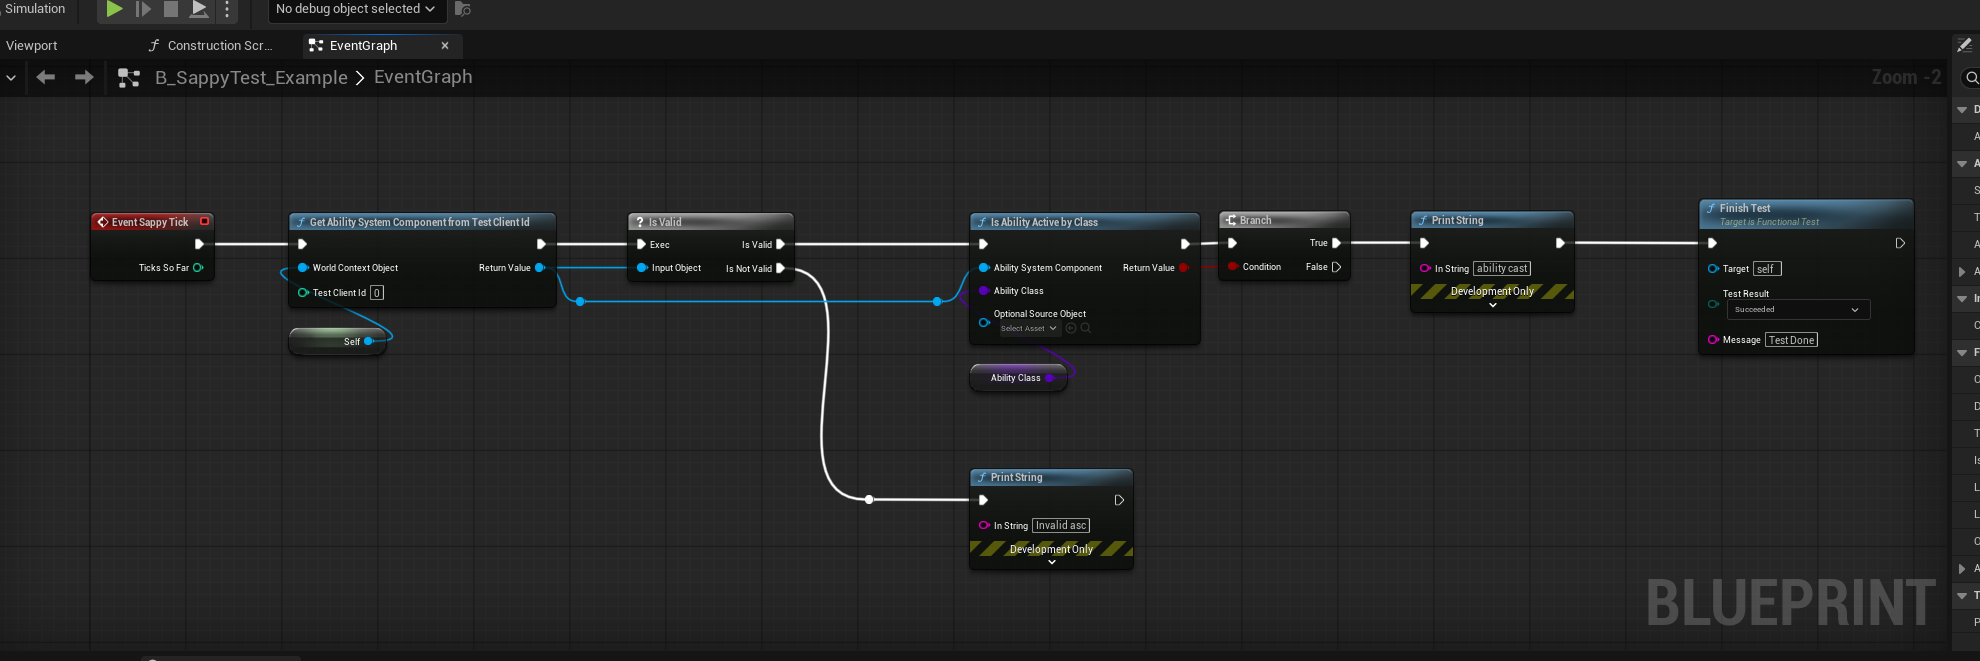
Hero State Validation
During test execution, validate hero states:
void AMyTest::SappyTick(uint64 TicksSoFar)
{
    // Get hero references
    if (ALyraCharacter* Hero = GetHeroForPlayer(0))
    {
        // Check hero position, health, abilities, etc.
        FVector HeroPos = Hero->GetActorLocation();
        float Health = Hero->GetHealth();

        // Validate test conditions
        if (Health <= 0)
        {
            FinishTest(EFunctionalTestResult::Failed, "Hero died unexpectedly");
        }
    }
}
Test Execution Flow
1. Initialization Phase
Load Game Features (TopDownArenaHeroes → SappyAutomatedTests)
    ↓
Initialize Gauntlet Controller
    ↓
Wait for Required Clients
2. Map Loading Phase
Check Pending Maps
    ↓
Server Travel to Test Map
    ↓
Wait for Map Load
    ↓
Synchronize Clients (USappyNetTestComponent)
3. Test Discovery Phase
Scan for ASappyNetAutomatedTest actors in world
    ↓
Validate Test Requirements (client count, filters)
    ↓
Queue Valid Tests
4. Test Execution Phase
For each test:
    ├─ Call PrepareTest()
    ├─ Wait for SappyIsTestReady()
    ├─ Start deterministic simulation
    ├─ Call SappyTick() every frame (60hz)
    └─ Wait for FinishTest() or timeout
5. Results Collection Phase
Collect test results
    ↓
Log passed/failed tests
    ↓
Process next map or finish session